
Winter Watercolour Snowflake Tutorial for Kids (or kids at heart)

Disclaimer: this post contains affiliate links. This creates NO extra charge for you but may provide me with a small commission. This allows me to continue working on this blog and creating free content. I will never link anything I do not love!
Looking for a simple yet rewarding painting activity? Well look no further! This snowflake themed winter watercolour project requires minimal skill to achieve great results while practicing masking!
Masking in painting is the process of covering up areas to protect them from paint. This is how we’ll achieve the crisp, clean snowflake!
You will need:
- Watercolour paper (this is what is used)
- Watercolour paint (I used the palette from this kit)
- Paintbrushes that hold water (I like these)
- 0.5†Painter’s and/or Washi tape (I used this washi tape)
- Very thin painter’s and/or Washi Tape (you can cut strips or or use this thin washi tape that I do)
How to lay the tape:
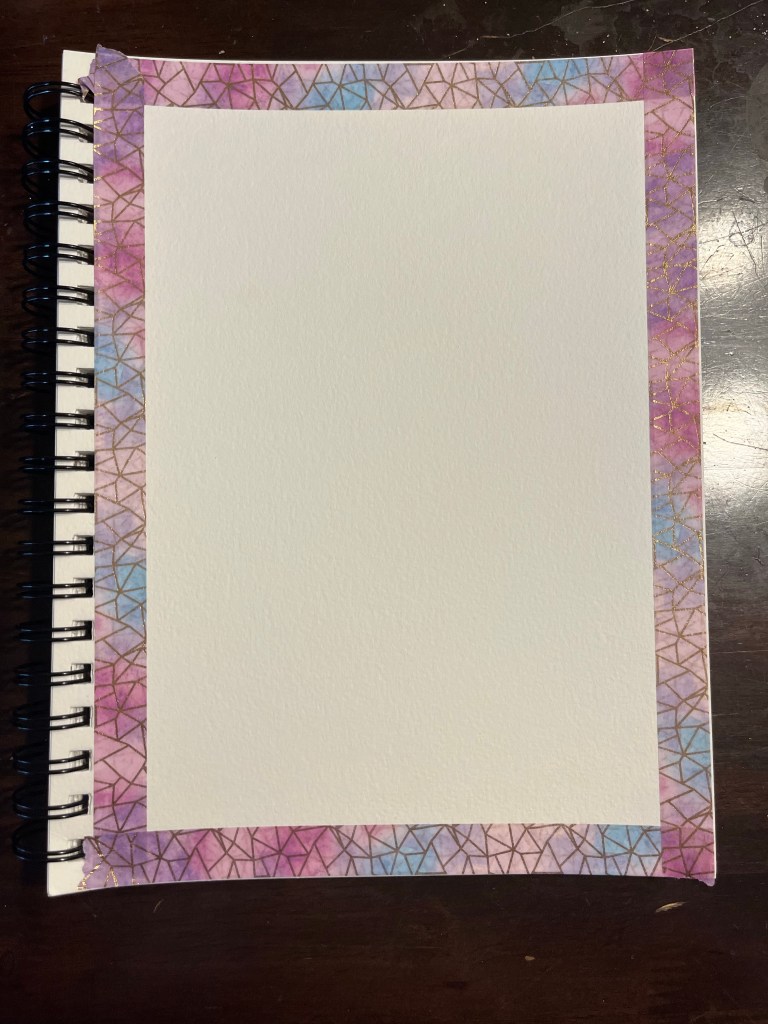
First, start by taking a new piece of watercolour paper and taping off the outer edges using your thicker tape. Pictured above, I am using 0.5†wide washi tape. Get the tape as close to the edges and as straight as possible. I overlap the corners. Smooth it down in place.

Next, using the very thin washi tape (or strips you’ve cut), lay down your snowflake. To do this, cut 3 longer pieces of tape and place 2 diagonally overlapping in the middle to form an “Xâ€. Then, place the last piece horizontally, overlapping the other 2 pieces in the middle.
Repeat this process with 3 shorter lengths of thin tape in the existing gaps. Cut 2 small (~0.25â€) pieces of thin tape per end to create the ends of the snowflake. Place them in a “V†shape. Note: You can also add in very tiny squares of tape around the snowflake for a nice effect.
How to paint:

This part is up to you! To achieve this look, I used a wet brush without paint to create a wet background (a wash). I then used the same wet paint brush to dropped pigments onto the wet background. I allowed the colours to move and blend together.
You may choose to use one solid colour or a mix of many! I find it helpful to plan my colours beforehand. I chose to use blues, pinks and purples but while painting I couldn’t resist some of the metallic golds and yellows in my palette. Once you’re happy with your painting, set it aside with the tape still on to dry.

The finished painting:

Once your paint is completely dry, begin gently peeling away the tape from your paper. Painter’s and Washi tape are generally not very tacky, so they should lift easily. If you notice any spots on your painting that are still damp, leave it to dry a while longer before continuing to remove the tape.
That’s it! You’ve competed your winter watercolour snowflake- wooohoo! Wasn’t that so easy? This tutorial covered one of many ways to mask while painting. If you liked this project, you may wish to experiment with stencils and/or masking fluid for a similar effect.
I hope you enjoyed this watercolour tutorial and are inspired to create more! Keep creating everyday magic, xoxoSades.


